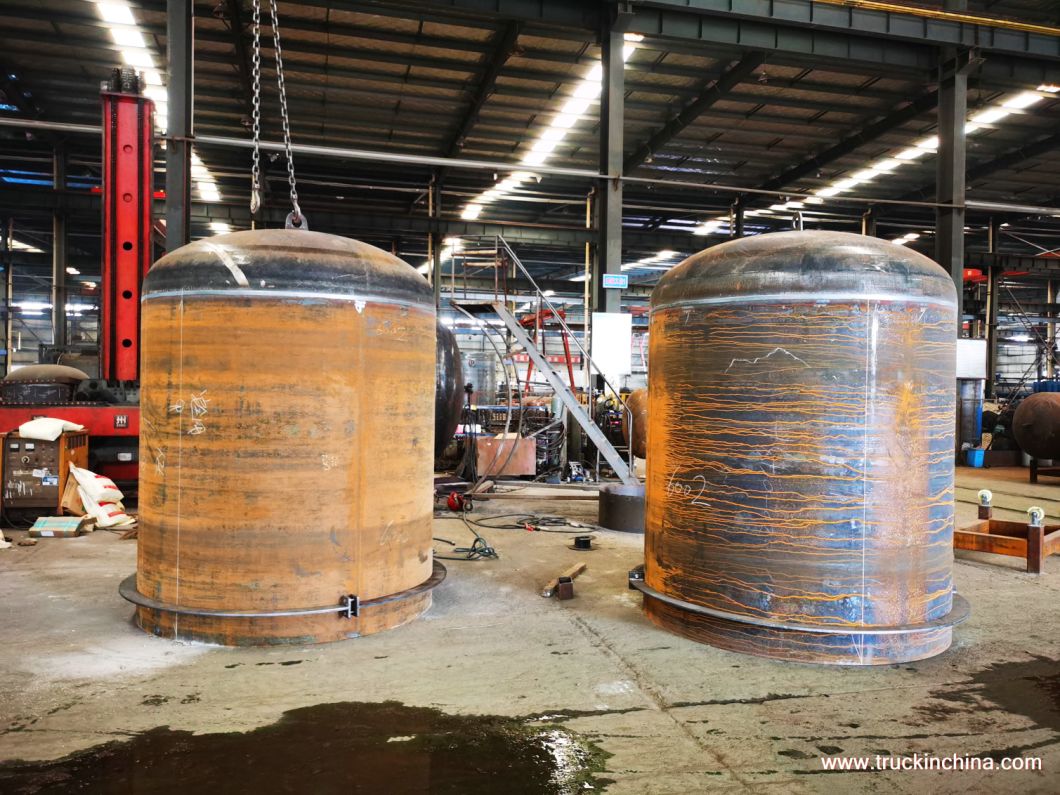
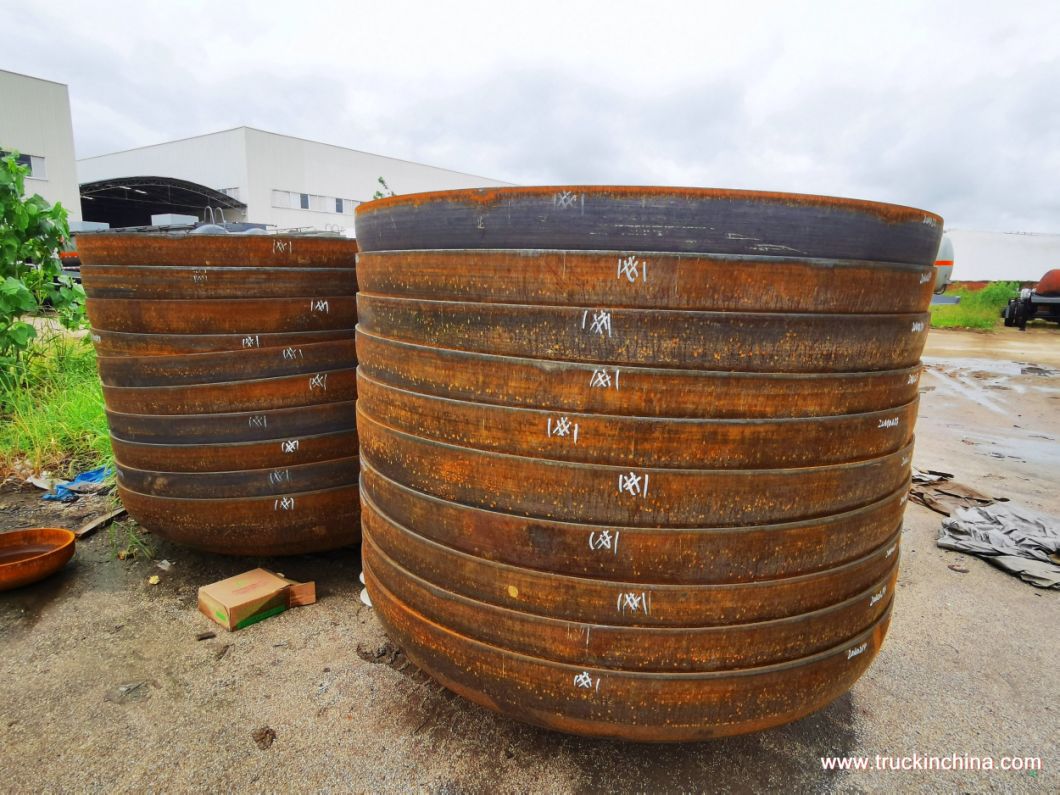
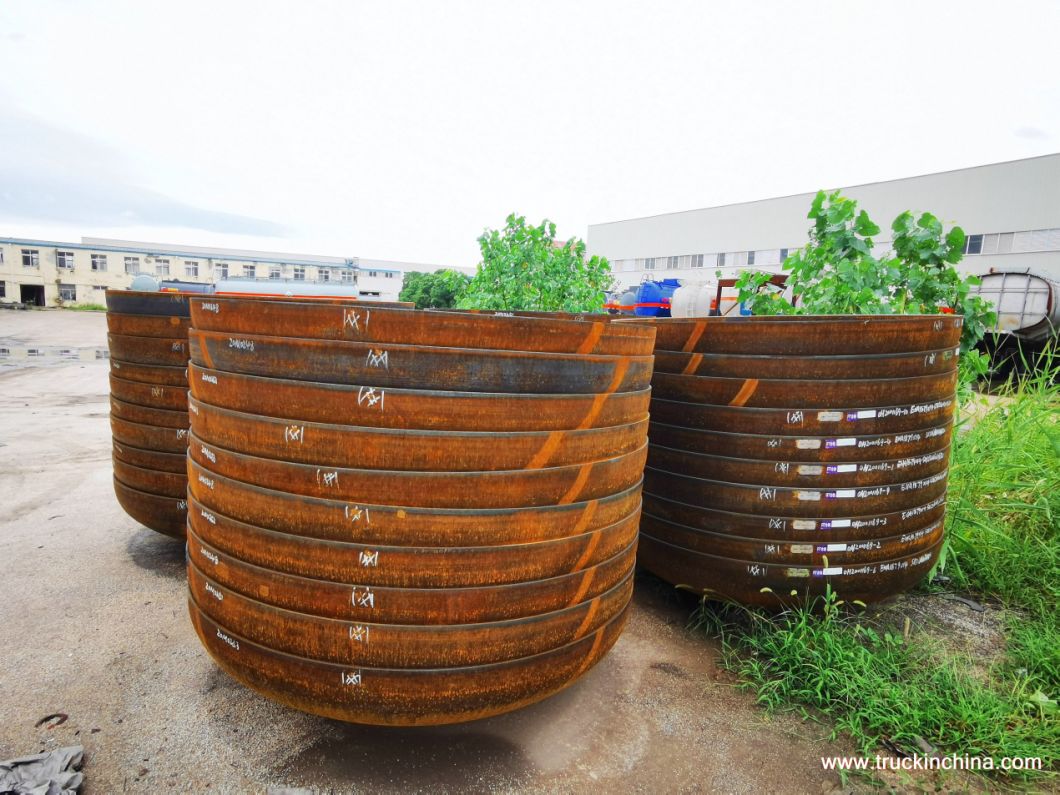
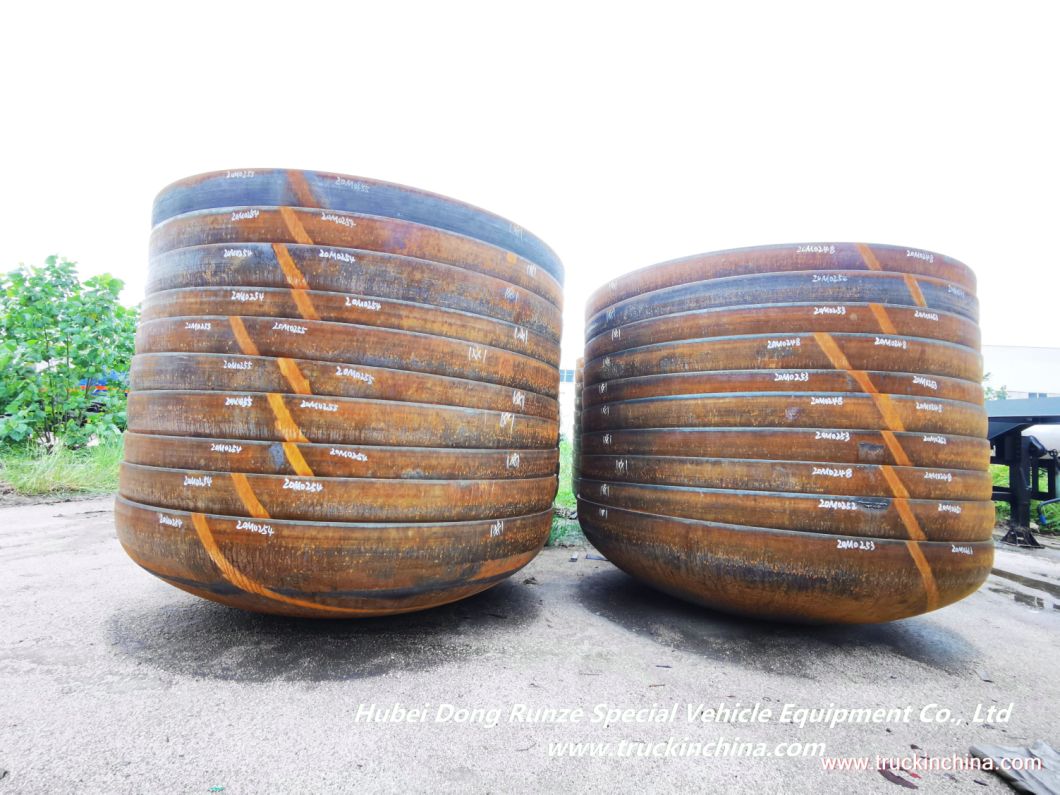
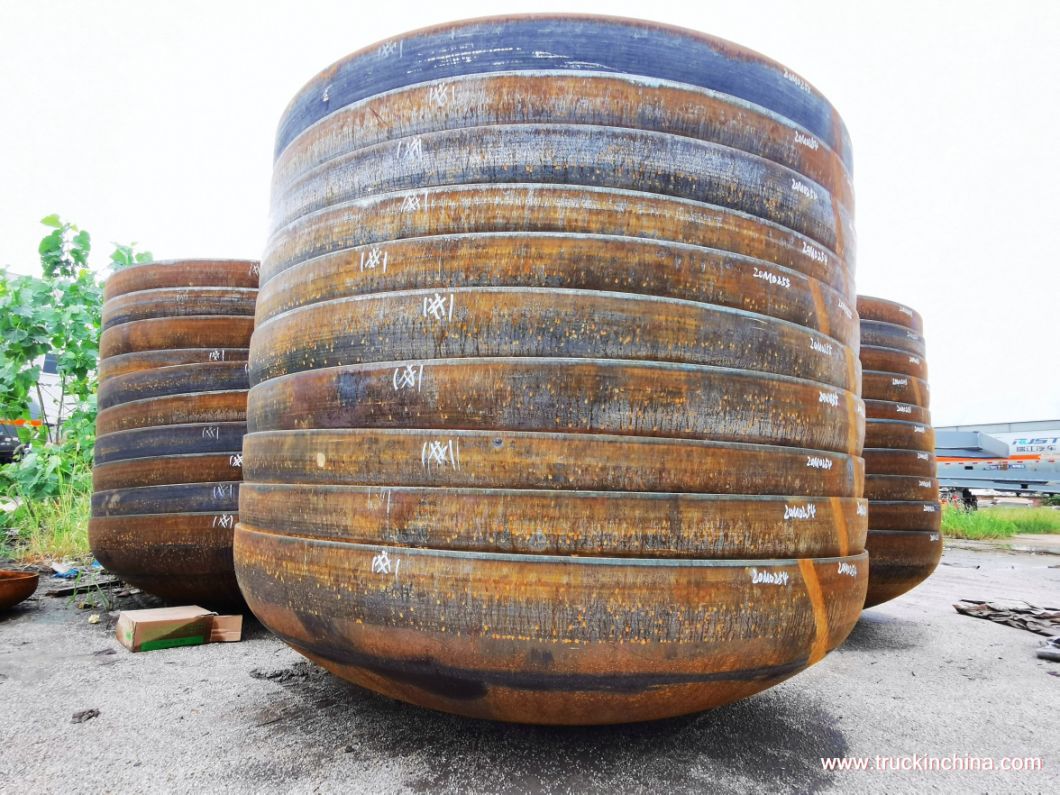
Cutomized Tank Head Cap For Pressure Vessel T21 T22 T50 T75 Tank
Torispherical Heads Dished Head Joggle Dished Head Dished Head with Hot Press Hemispherical Dished Head by Cold Press Detailed Photos


Product Parameters
1, Description
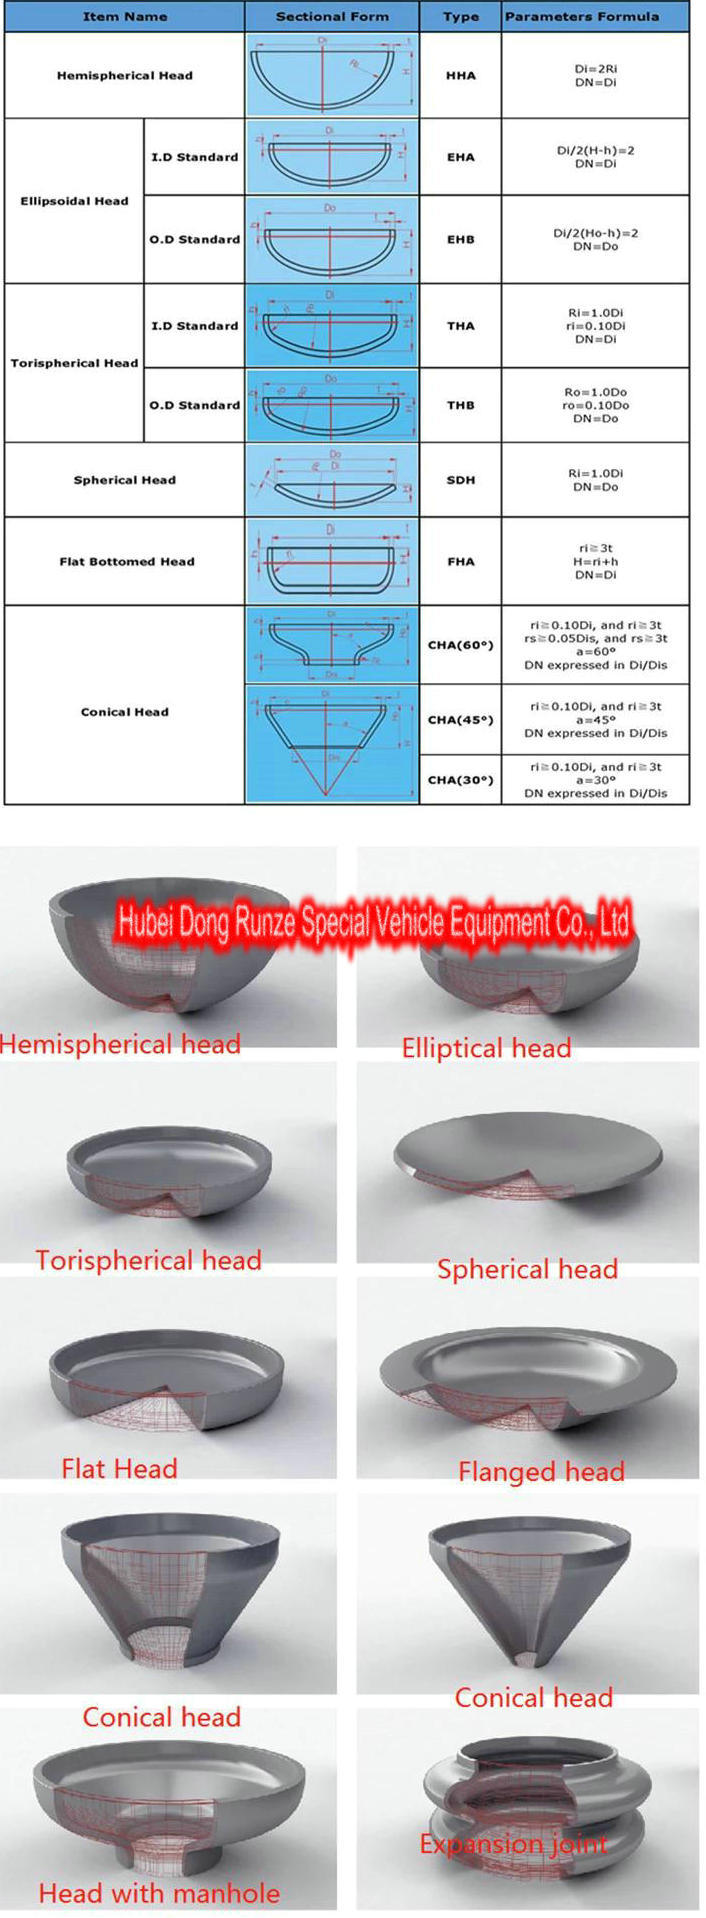
This is called an elliptical head. the shape of this head is more economical beasue the height of the head is just a graction of the diameter.its radius varies between the major and minor axis;usually ratio is 2:1
this size heads are used externsively in the construction of tanks for liquefied petroleum gas, air recievers and other unfired pressure vessels.these heads can be fored form carbon steel,stainless steel ,and other ferrous and non-ferrouns metals and alloys.
2, Application:
Gas and Oil industry, Petrochemical industry, food, etc
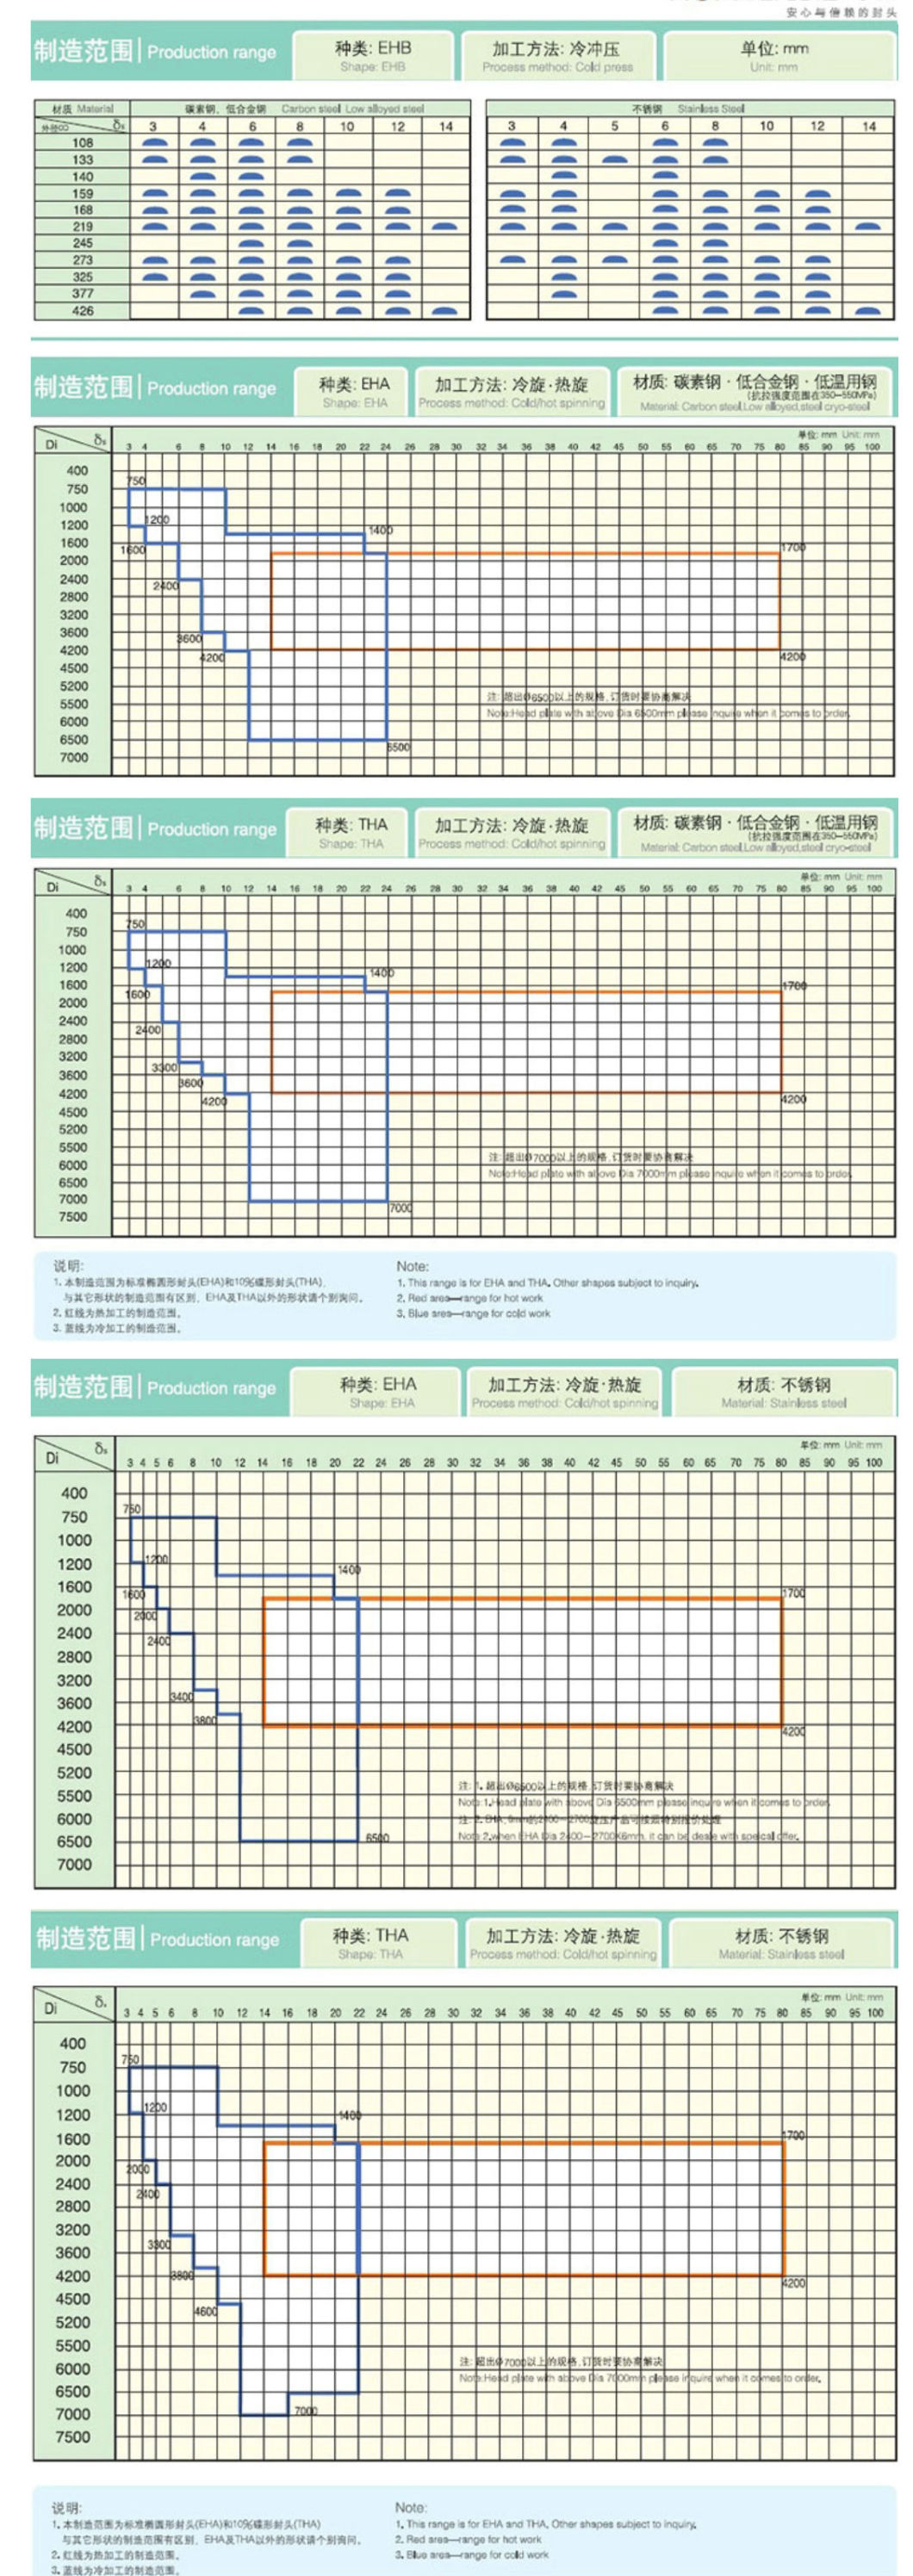
3, forming range (see below excel)
Note that:
A: The below heads was formed by hokkai with one piece plate,
B: Pls check with me if the range is out of the below range, pls contact with me
C, the forming range is not included in petals fabrication way.
4, Order information
Pls provide us with below information
1) Material grade. Including special requirement if have
2) Head Diameter
3) Nom THK or min thick
4) Straight Flange if have
5)others special forming process
Customizing various shapes of heads with ASME VIII-1 with U stamp, EN1345, AS1210 or China code etc.
Pls contact with me by the below E-mail adress if you have any further queries.
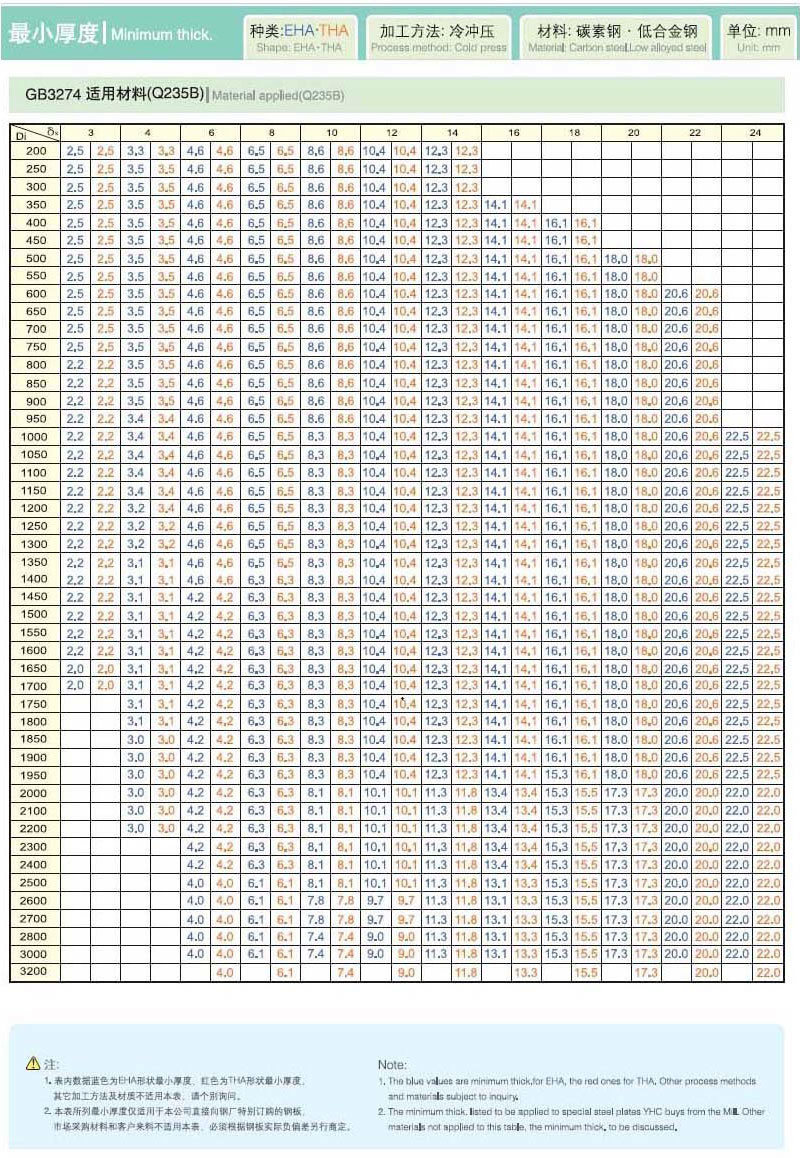
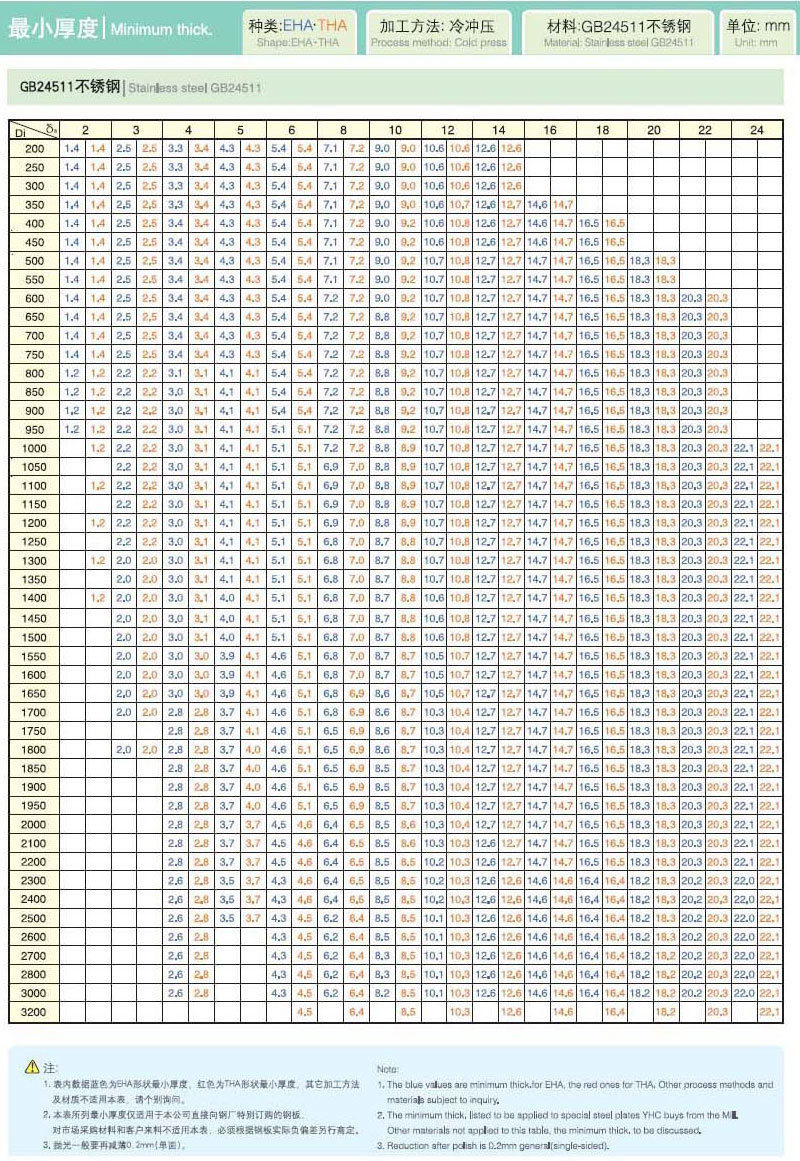
Cold press range:
| Diameter | 200mm-3200mm |
| Thickness | 2mm-24mm |
Cold Spinning
| Diameter | 750mm-9000mm |
| Thickness | 2mm-42mm |
Segment forming
| Diameter | no limit |
| Thickness | below 90mm |
| Standard Dished Heads for Tank |
| Diameter | Thickness(Mm) | Material | Exw Unit Price | |
| ND1440 | 8 | Q235-A | USD | 413.00 | per piece |
| ND1528 | 8 | Q235-A | USD | 427.00 | |
| ND1570 | 6 | Q235-A | USD | 420.00 | |
| ND1716 | 6 | Q235-A | USD | 445.00 | |
| ND1750 | 6 | Q235-A | USD | 457.00 | |
| ND1900 | 6 | Q235-A | USD | 465.00 | |
| ND1980 | 6 | Q235-A | USD | 472.00 | |
| ND2500 | 6 | Q235-A | USD | 459.00 | |
| ND2000 | 6 | Q235-A | USD | 446.00 | |
| ND2100 | 5 | Q235-A | USD | 429.00 | |
| ND2100 | 6 | Q235-A | USD | 479.00 | |
| ND2150 | 6 | Q235-A | USD | 493.00 | |
| ND2600 | 6 | Q235-A | USD | 582.00 | |
| ND2420 | 6 | Q235-A | USD | 541.00 | |
| ND2250 | 6 | Q235-A | USD | 501.00 | |
| ND2450 | 6 | Q235-A | USD | 544.00 | |
| ND2300 | 6 | Q235-A | USD | 509.00 | |
| ND2200 | 6 | Q235-A | USD | 488.00 | |
| ND2400 | 6 | Q235-A | USD | 532.00 | |
| ND2400 | 5 | Q235-A | USD | 509.00 | |
| ND2480 | 6 | Q235-A | USD | 551.00 | |
| ND2550 | 6 | Q235-A | USD | 568.00 | |
Minimum Thickness Tank Dish Head


FAQ
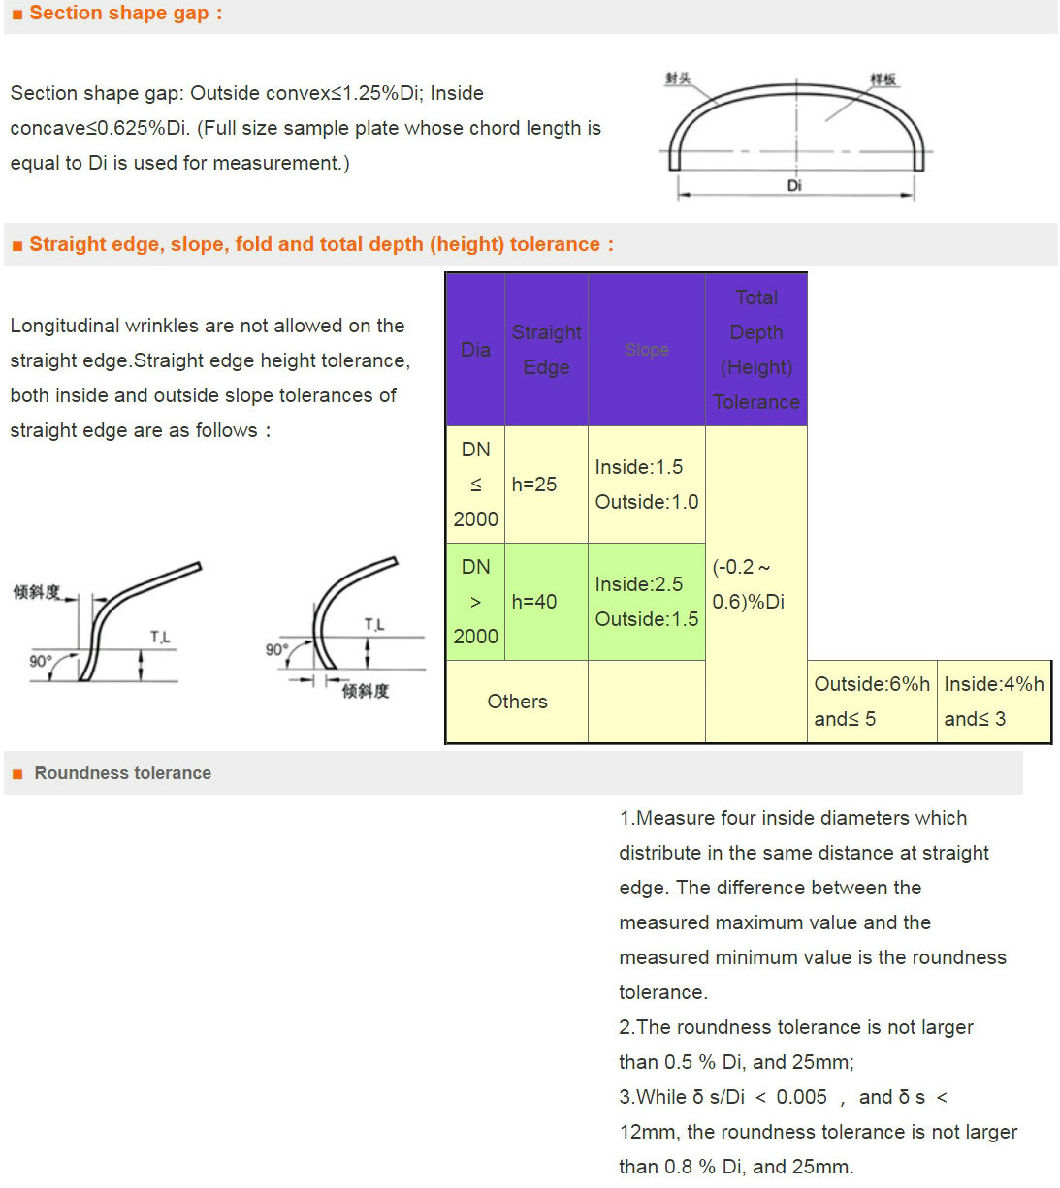
Ellipsoidal Head (EHA OR EHB) Inspection standard
Section shape gap: Outside convex≤1.25%Di; Inside concave≤0.625%Di. (Full size sample plate whose chord length is equal to Di is used for measurement.) 
1.Measure four inside diameters which distribute in the same distance at straight edge. The difference between the measured maximum value and the measured minimum value is the roundness tolerance.
2.The roundness tolerance is not larger than 0.5 % Di, and 25mm;
3.While δ s/Di < 0.005 , and δ s < 12mm, the roundness tolerance is not larger than 0.8 % Di, and 25mm.
| The tolerance of slope and dimension and groove roughness |
| program | Tolerance | | Groove Angle | ± 2.5° | | Obtuse Width | ± 1mm | | Groove Roughness | | | No defects such as flow, layered, inclusion are allowed. | |
| External circumference tolerance and inside diameter tolerance |
| Nominal diameter | Steel products thickness | inside diameter tolerance ID | External circumference tolerance | | DN < 600 | 2 ≤ δ s < 4 | ± 1.5 | ± 4 | | 4 ≤ δ s < 6 | ± 2 | ± 6 | | δ s ≥ 6 | ± 3 | -3~ 9 | | 600 ≤ DN < 1000 | 2 ≤ δ s < 4 | ± 2 | ± 6 | | 4 ≤ δ s < 6 | ± 2 | ± 6 | | δ s ≥ 6 | ± 3 | -3~ 9 | | DN ≥ 1000 | all | ± 3 | -3~ 9 | |
Notes:While Di ≥ 1000 and δs < 10mm , take external circumference tolerance as criterion. The inside diameter tolerance or the external circumference tolerance can be decided through the discussion between the two parties.
Notes:1 Standard length of external circumference = (inside diameter nominal thickness 2 ) π (3.1416). 2 Under the circumstance of inside diameter tolerance, measure four inside diameters which distribute in the same distance at straight edge, and take the average value of measured inside diameter. |
| Surface quality |
1.The measured minimum thickness of welding seam shall not be less than the minimum guaranteed thickness. The welding seam height should not be 0.5mm lower than mother material.
2.Under the circumstance of step stamping, circle impression will be taken place. The gap measured by sample plate should be less than 1.5mm .
3.The pits on the material surface should be ground. The grinding depth should be less than 5% δ s and 2mm . Otherwise compensating welding is needed.
4.The depth of the riffle on end cover surface shall not be larger than 0.2mm . While the ground area on end cover is less than 20%, surface treatment should be done over whole end cover.
5.If customers have special requirements for end cover surface, shall follow the customers' requirements. |
Tank dish Head manufacturing range

Torispherical Head (Type THA, THB, XD OR MD) Stainless Steel Flangedℜverse Dished Head Tank Container Head (ID2180*6) Cryogenic Vessel Head Flange (BL/TH/SW/WN/LJ/SO) Flange Only Dished Head (FHA) Flange Only Dished Head (FHA) Dished End Dished End Dished Heads with Hole (SHD) Dished End (DHA) Dished End (MD) Dished&Flared ASME Elliptial Head Saddle Stainless Steel Cutting Parts En ISO/PED/ASME U U2 Stamp Certificated Dish End Dished End Cap Stainless/Carbon Steel or Other Materials Dish Head Made by Cold/Hot Press&Spinning or Segment. Fermenter Tank Dished Heads Cold Press Dished End with Carbon Steel Stainless Steel Hemispherical Head Stainless Steel Dished Head 2: 1 True Ellipsoidal Dished Head End by Segment and Petals Forming Cold Press Dished End Cold Press Dished End Forming Heads by Hot Press Carbon Steel Dished Head Petal Fabrication Hemispherical Ends Carbon Steel SA516gr70 Hemispherical Heads LPG Tank Head with Carbon Steel Stainless Steel 304 Dished Only Heads FOB Price: US $4.4-7.8/ kg Dished Head Transport Packing Solutions Cone Type Heads by Single Piece FOB Price: US $3.4-3.6 / kg Copper Elliptical 2: 1 Dished Ends 10% Torispherical Dished Head with Cold Forming FOB Price: US $1-99,999 / kg Varied Dished Ends with Clad Plates Heavy Dished Ends for Sugar Plants Stainless Steel Cone for Heat Exchangers FOB Price: US $1-99,999 / kg Cold Pressed 2: 1 Ellipsoidal Head SA240-304 Flange Only Dished Heads FOB Price: US $1-99,999 / kg Stainless Steel Dished Head Ellipsoidal Dishe Head Made by Cold Press&Spinning for Food, Oil&Gas Industry Equipment, Pressure Vessel etc. Ellipsoidal Head by Hot Press 10% Torispherical Head by Cold Press Flanged Only Head 2075*6mm by Cold Spinning 10% Torispherical Head 700*8mm by Cold Press 10% Torispherical Head 1100*3mm by Cold Press Ellipsoidal Head 4000*10mm by Cold Spinning Dished Only Head 1100*5mm Cold Spinning 10% Torispherical Head 1450*6mm by Cold Press Cone Head 850*4mm by Cold Spinning 10% Torispherical Head 1600*3mm by Cold Press Ellipsoidal Head 1300*10mm by Cold Press 10% Torispherical Head 1200*3mm by Cold Press 10% Torispherical Head 1700*3mm by Cold Press Ellipsoidal Head 1000*7.9mm by Cold Press Ellipsoidal Head 800*6.4mm by Cold Press Ellipsoidal Head 5200*16mm by Cold Spinning 10% Torispherical Head 300*4mm by Cold Press Dished&Flared Head 538*6mm by Cold Press Ellipsoidal Head 219*3mm by Cold Press 10% Torispherical Head 2384*8mm by Cold Spinning Approximate Elliptical Head 1320*11mm by Cold Press Cone Head 1300*12mm by Cold Spinning Shallow Torispherical Head 1006*3mm by Cold Spinning Ellipsoidal Head 3400*54mm by Hot Spinning Elliptical Head 3500*70mm by Hot Press 10% Torispherical Head 700*6mm by Cold Press 10% Torispherical Head 1800*3mm by Cold Press 10% Torispherical Head 600*4mm by Cold Press Ellipsoidal Head 450*22mm by Hot Press Ellipsoidal Head 650*3mm by Cold Press Flanged Only Head 1955*8mm by Cold Spinning 10% Torispherical Head 450*2mm by Cold Press for Pressure Vessel Food Beer Can Gas and Oil Industry etc. 10% Torispherical Head 500*3mm Made by Cold Press for Pressure Vessel Food Beer Can Gas and Oil Industry Petrochemical Industry etc. 10% Torispherical Head 1700*3mm Made by Cold Press for Pressure Vessel Food Beer Can Gas and Oil Industry Petrochemical Industry etc. PED Certified Stainless Steel 10% Torispherical Head Made by Cold Press for Pressure Vessel Food Beer Can Gas and Oil Industry Petrochemical Industry etc. Stainless Steel Ellipsoidal Head 700*4mm by Cold Press for Gas and Oil Industry, Petrochemical Industry, Food, etc PED Certified Stainless Steel Torispherical Head 1100*8mm Made by Cold Spinning for Pressure Vessel Food Beer Can Gas etc. Stainless Steel Ellipsoidal Head 6000*22mm by Segment Cold Spinning Stainless Steel Special Shape Dish Head Made by Cold Press Stainless Steel Dish Head 10% Torispherical Dished Head 2000*4mm Made by Cold Press for Pressure Vessel Food Beer Can Gas etc. Stainless Steel Ellipsoidal Dish Head Made by Segment and Petals Forming Stainless Steel Ellipsoidal Dish Head 800*3mm by Cold Press for Gas and Oil Industry, Petrochemical Industry, Food, etc Stainless Steel Ellipsoidal Dish Head 800*5mm by Cold Press for Gas and Oil Industry, Petrochemical Industry, Food, etc Stainless Steel Dish Head Shallow Torispherical Dished Head 4350*12mm Made by Cold Spinning for Pressure Vessel Food Beer Can Gas etc. Stainless Steel Hemispherical Dish Head 1850*6mm Made by Segment and Petal Fabrication for Gas&Oil Industry etc. Stainless Steel 10% Torispherical Dish Head 1400*10mm Made by Cold Press for Pressure Vessel Food Beer Can Gas and Oil Industry Petrochemical Industry etc. Stainless Steel Hemispherical Dish Head 2200*45mm Made by Spinning for Oil&Gas Industry Pressure Vessel etc. Stainless Steel 10% Torispherical Dish Head 2200*4mm Made by Cold Press for Pressure Vessel Food Beer Can Gas and Oil Industry Petrochemical Industry etc. Stainless Steel 10% Torispherical Dish Head 1400*2mm Made by Cold Press for Pressure Vessel Food Beer Can Gas and Oil Industry Petrochemical Industry etc. Stainless Steel Shallow Torispherical Dish Head 427*4mm by Cold Press for Food Pressure Vessel Oil&Gas Industry Equipment etc. Stainless Steel Ellipsoidal Dish Head 406*3mm by Cold Press for Gas and Oil Industry, Petrochemical Industry, Food, etc Stainless Steel Flanged Only Dish Head 1277*5mm by Cold Spinning for Tank Food Beer Can etc. FOB Price: US $1-999,999 / Piece Stainless Steel 10% Torispherical Dish Head 800*6mm Made by Cold Press for Pressure Vessel Food Beer Can Gas and Oil Industry Petrochemical Industry etc. Stainless Steel Ellipsoidal Dish Head 750*2mm by Cold Press for Gas and Oil Industry, Petrochemical Industry, Food, etc Stainless Steel Dished Head Ellipsoidal Dish Head 2800*20mm by Cold Press for Gas and Oil Industry, Petrochemical Industry, Food, etc Stainless Steel Dished Head 10% Torispherical Dish Head 850*3mm Made by Cold Spinning for Food Beer Can Gas&Oil Industry Petrochemical Industry etc. Stainless Steel Dished Head Ellipsoidal Dish Head 950*2mm Made by Cold Press for Gas&Oil Industry Equipment, Petrochemical Industry, Food, etc Aluminium Plate Dished Head Ellipsoidal Dish Head 400*3mm by Cold Press Titanium Sb265gr2 Dished Head Hemispherical Dish Head 1000*10mm Made by Hot Press Stainless Steel Dished Head Hemispherical Dish Head 800*3mm Made by Cold Press for Oil&Gas Industry Pressure Vessel etc. Stainless Steel Dished Head Dished&Flared Dish Head 496*6mm by Cold Press Stainless Steel Dished Head 10% Torispherical Dish Head 800*2mm Made by Cold Press for Pressure Vessel Food Beer Can Gas and Oil Industry etc. Stainless Steel Dished Head Shallow Torispherical Dish Head 500*3mm by Cold Press for Food Pressure Vessel Oil&Gas Industry Equipment etc. Stainless Steel Dish End Dished Only Dish Head 1850*6mm Made by Spinning for Pressure Vessel Tank etc. Stainless Steel Dish End Torispherical Dish Head 800*6mm by Cold Press for Pressure Vessel Food Beer Can Gas and Oil Industry Petrochemical Industry etc. Stainless Steel S32168 Dish End Ellipsoidal Dish Head 2800*16mm Made by Cold Press for Gas&Oil Industry Equipment, Petrochemical Industry, Food, etc Stainless Steel Dished Head Ellipsoidal Dish Head 2400*8mm Made by Cold Press for Gas&Oil Industry Equipment, Petrochemical Industry, Food, etc ASME U Certificated Dished Head Stainless Steel SA240-304 Torispherical Dish Head 1600*4mm by Cold Press for Pressure Vessel Food Beer Can Gas and Oil Industry. Stainless Steel S31603 Dished Head Hemispherical Dish Head Cap 3500*60mm Made by Segment and Petals Forming for Oil&Gas Industry Pressure Vessel etc. Segment&Petals Forming Dished Head Cap Torispherical Dished End Stainless Steel SA240-304L Dished End Ellipsoidal Dish Head 6400*22mm Made by Segment&Petals Forming for Tank Pressure Vessel Oil&Gas Industry Equipment etc. Stainless Steel Dished Head Flanged Only Dish Head 1761*8mm by Cold Spinning for Tank Food Beer Can etc. Stainless Steel Dish End Torispherical Dish Head 1100*6mm by Spinning for Pressure Vessel Food Beer Can Gas and Oil Industry Petrochemical Industry etc. Stainless Steel 304 Dished Head End Cone Dish Head 954*4mm by Cold Spinning Stainless Steel Dished End Torispherical Dish Head 790*4mm by Cold Spinning for Food Pressure Vessel Tank Oil&Gas Industry Equipment etc. Stainless Steel S30408 Dish End Dished Only Dish Head 1434*6mm Made by Spinning for Pressure Vessel Tank etc. Stainless Steel Dished End Cap Ellipsoidal Dish Head 3000*12mm Made by Cold Press for Gas&Oil Industry Equipment, Petrochemical Industry, Food, etc Stainless Steel S30408 Dished End Cap Ellipsoidal Dish Head 4000*10mm Made by Cold Spinning for Gas&Oil Industry Equipment, Petrochemical Industry, Food, etc Carbon SA516gr70n Dish End Ellipsoidal Dished Head 2500*14mm Made by Cold Spinning with Pipe&Flange Connected Stainless Steel Dished End Hemispherical Dish Head Cap Made by Segment and Petals Forming for Oil&Gas Industry Pressure Vessel etc. Stainless Steel Dished Head S30408 Dished End Ellipsoidal Dish Head 2800*20mm Made by Cold Press for Gas&Oil Industry Equipment, Petrochemical, Food, etc Stainless Steel 331603 Dished End Torispherical Dish Head 1700*8mm Made by Cold Press for Food Pressure Vessel Tank Oil&Gas Industry Equipment etc. Stainless Steel Dished Head Flangedℜverse Dished Ends Made by Cold Spinning for Food Pressure Vessel Tank etc. Stainless Steel 316L Dished End Torispherical Dish Head 1400*12mm Dished Cap Made by Cold Press for Food Pressure Vessel Tank Oil&Gas Industry Equipment etc. Stainless Steel Dished End Torispherical Dished Head 1114*4mm by Cold Spinning for Food Pressure Vessel Tank Oil&Gas Industry Equipment etc. Stainless Steel Dished Head S30408 Dished End Ellipsoidal Dish Head 2100*10mm Made by Cold Press for Gas&Oil Industry Equipment, Petrochemical, Food, etc Stainless Steel Dished Head S30408 Dished End Ellipsoidal Dish Head 2000*10mm Made by Cold Press for Gas&Oil Industry Equipment, Petrochemical, Food, etc Stainless Steel Dished Head SA240-304 Dished End Approximate Ellipsoidal Dish Head 1320*11mm Made by Cold Press for Gas&Oil Industry Equipment, Food, etc Stainless Steel Dished Head 3042b Dished End Torispherical Dish Head 800*4mm by Cold Spinning for Food Pressure Vessel Tank Oil&Gas Industry Equipment etc. Stainless Steel Dished Head S30408 Dished End Hemispherical Dish Head 600*4mm Made by Cold Press for Oil&Gas Industry Pressure Vessel etc. Stainless Steel Dished Head S30408 Dished Cap 2: 1 Ellipsoidal Dish Head 3000*12mm Made by Cold Press for Gas&Oil Industry Equipment, Food, etc U Stamp Certificated Dished Head Stainless Steel SA240-304 Dished Cap 2: 1ellipsoidal Dish Head 1836*9mm by Cold Press for Gas&Oil Industry Equipment, Food, etc Stainless Steel Dished End S31603 Dish End Torispherical Dish Head 1600*4mm by Cold Press for Food Pressure Vessel Tank Oil&Gas Industry Equipment etc. Stainless Steel Dish End S30403 Dished Head Cone Dish Head 3100*20mm by Cold Spinning Stainless Steel Dish End S31603 Dished End Cap Hemispherical Dish Head 3350*60mm Made by Segment&Petal Forming for Oil&Gas Industry Pressure Vessel etc. Stainless Steel Dish End SA240-304 Dish Head Approximate Elliptical Head End Cap 1320*11mm by Cold Press for Gas&Oil Industry Equipment, Food, etc Stainless Steel Dish End S31603 Dish Head Elliptical Head End Cap 4000*12mm by Cold Spinning for Gas&Oil Industry Equipment, Food, etc ASME U Stamp Certificated Stainless Steel Dish End SA240-304 Dish Head Elliptical Head End Cap 1836*9mm by Cold Press for Gas&Oil Industry Equipment, Food, etc Stainless Steel Dished End SA240m-304 Dish Head Elliptical Dished Head End Cap 2300*74mm by Hot Press for Gas&Oil Industry Equipment, Food, etc Stainless Steel Dished End Elliptical Dish Head 1500*6mm Made by Cold Press Carbon Steel Sm520b Dished End Elliptical Dish Head End Cap 800*6.4mm Made by Cold Press. 
